Sunday 20 March 2011

# 4 Card from wrappers

Long long time ago, there's an event we have to organise and we've got to think creatively to use whatever we have to do all these crafts.  So our friend have some wrappers that was used to wrap her flowers and with that, we did this recycle card here.
What you need is 2 plastic/paper wrappers (2 different color), ribbons, foils or transparent hard cover, puncher & scissors. 


There's 3 ply here.  The first was a transparent wrapper with love shape on it. Second was the foil/transparent hard cover and finally the third was a color wrapper.  Cut all the pieces into a rectangle shape and punch holes at the top.  Put on a ribbon through the 2 holes and tie them into a ribbon. Then just simply punch other holes as you like as a design on the card.


Finally, you can use a marker or ball pen to write on the foil/transparent hard cover.  Just lovely! You can do your part to recycle items that you do not need and create something special and lovely for your friends.

Thursday 10 March 2011

# 3 Paper bunny

Lovely Paper bunny! Check this out at here - Canon creative park
It's easy to do if you follow the instructions at the website. Just ensure that the last area you should stick is the head *v*


Puppet

You know I bought this white with frog print hand glove (right side) from 100yen and my girl thought it's a puppet for her to play LOL  It looks like a snake when you open up the 'mouth'!   I think it's a good idea too. So let's have fun with your kids with this 'puppet' LOL ^v^


Sunday 6 March 2011

# 2 Cherry Blossom Flower

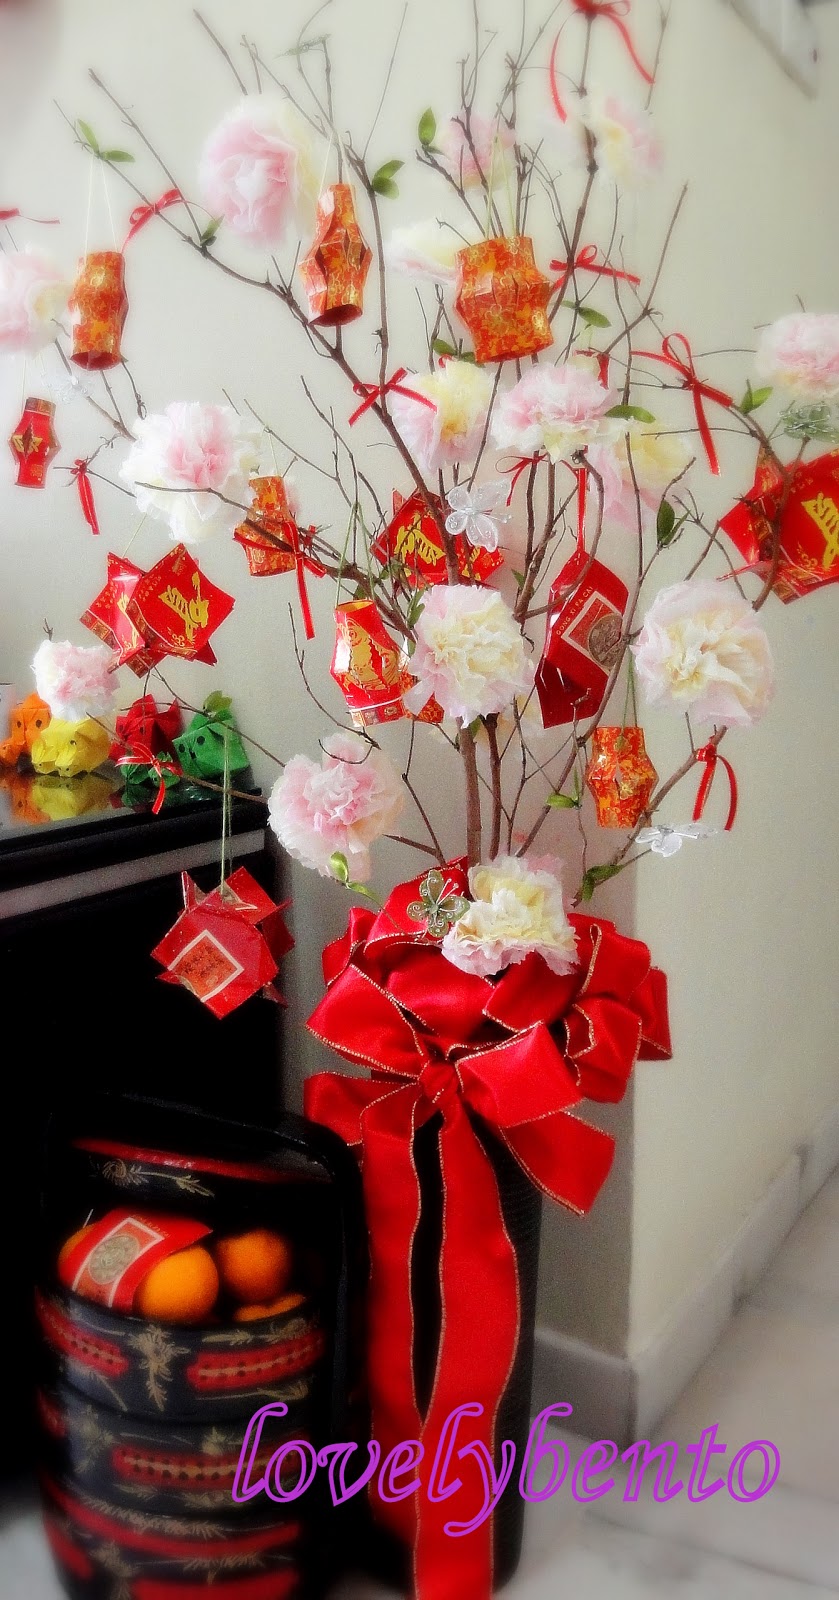
This cherry blossom flower is really lovely and presentable especially for Chinese New Year. So me and my little girl did this cherry blossom flowers together and tied on the tree branches. She then made all the tanglungs by herself and hang it on the tree.  I tied some red ribbons and prepared some leaves made from ribbons and here is how it looks like.. Niceeee? Well you can make many things out of this cherry blossom flowers not just for CNY.. am sure you can think of a lot of things from this ^v^


To make the flowers and the leaves, these are the materials that you need; color tissue papers (or you can use other types of paper eg. paper tissue from your local Art shop), green wire, green ribbons, ribbon scissors and wire scissors


Take 2 pieces of different color tissue papers and put on top of each other
Fold it like how you fold a fan at the middle or just accummulate the middle part until you get this ...hmm looks like a ribbon
 Then take a green wire and twine it in the middle and twist it and turn it, so to tighten it. The wire can just be 1/3 of the whole length if you just want to twine it to the tree branch, but if you want to make few stalks of flowers to put into a vase, then you may use the full length.  Use the wire cutter to cut the green wire.
 Above is how it looks like in the middle after twined.
Below, is how it looks like from the side
You may cut it to semi circle to make it smaller , depending on what size you want for your flower. Or you may even use your hands to just tear it ..this way it looks more like a flower ^v^

 This is how it looks after tearing it

Next, is to open up your little cherry blossom flower, softly ..layer by layer starting from the middle and finally to the outer layer and adjust it like a round shape

 Finally, till you get this 


How to make the leaves for your tree? Well just use the green ribbon and cut it out to be in this shape below and put the small little wire on it (if your ribbon is shinny on one side only, then put the wire on that side)

Then twine it the same way you twin the flower

These little ribbon leaves can then be added to your little tree or just twine it on the stalk of flower and you can finish up the stalk of flower with green tape
You can do a bunch of flowers for your vase, or make a little small one to stick on a birthday card, or just decorate your church with all these lovely flowers!  it's just inexpensive, but you just need some time to do it and enjoy the whole thing! ^v^

Look at the below,  you can even add a little butterfly to beautify your blossom flower plant


Tuesday 1 March 2011

# 1 Paper cup flowers

Let's start with this simple paper cup flowers. These are the items you need ~ paper cup, scissors, color pen. 

Cut a straight line until there's 1 inch left at the bottom of the cup.  Repeat this by leaving 0.5 inch space between the lines.  If you would like to put some items into this flower cup, then ensure that you do not cut until too deep to the bottom.
This is how it'll look like.  Press all the paper downwards like this:

Then twist one of the paper to the back of the next paper beside:
 Repeat it till you finished all of them:
So you can see the flower is done and you just need to do some colouring on it, as you like or even put some ribbons for deco:
(Flower on the left is done by my little girl, age 6 and was given to my dear friend)
Or even have a play with your kids like this :) they'll just enjoy this
(Put a satay stick with cello tape at the back of the cup and you can have a standing flower)
With this, you can also create a bunch of them with beautiful colors in a plant pot as a gift. So the next time after using a paper cup, just don't throw it, but wash it and keep it for this ..support recycling :)

Helloooooooo!

"Selamat datang" to my little lovely arts & crafts blog :)   I'm so happy that I've finally created this blog.  I've wanted to do so for quite some time already, but I was thinking and thinking and thinking about it.  Well, at last I did it!!  I hope to have this little diary to record down the arts & crafts made by my little girl and/or myself :)  and at the same time, to share ideas with friends out there too.  Am also hoping to get some ideas from other blogs/web to create more exciting and nice crafts.

Arts & crafts are fun to do.  It's good to let your kids to learn arts & crafts.  Kids will be more imaginative, creative, patience, etc etc etc ^ v ^

I'm not an expert nor a teacher in arts & crafts, but I think everyone can do so with their own imagination and creativity mind. Every time I look at the arts & crafts or decorations done, I always feel so eager to learn and do the same thing as what they have done.  It really takes my breath away at times! Such wonderful masterpiece! 

Wish me luck :)

xoxoXoXo, 
Fennie